

Building a Super-Sized Taco Bar
A 65-foot-long precast concrete bartop for a Taco Mac restaurant ends up being a tall order
By Bob Harris, The Decorative Concrete Institute, Temple, Ga.
Lately, it seems that we find ourselves with projects that force us to tap into the creative right side of the brain. On a recent project, this was certainly the case from the design perspective. However, we had to use whatever brain cells that were leftover when it came time to figure out how to build this project.
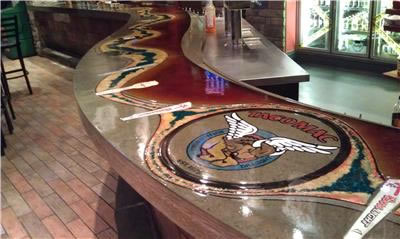 Taco Mac’s new 65-foot concrete bartop truly satisfies the owner’s requirements for “something unique but durable.”
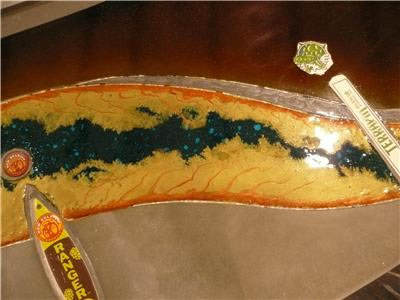
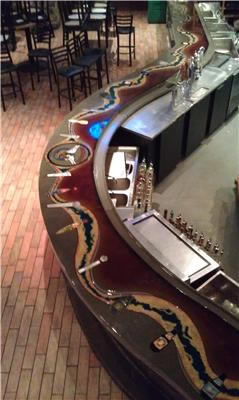 The finished bartop from an overhead perspective, showing all its contours and curves.
When local restaurant owner John Freer approached us on his options for a new bartop at his Douglasville, Ga., Taco Mac location, concrete seemed the obvious choice since the lifespan of his existing tiled bartop had expired. I asked John specifically what he was trying to achieve with his new bar. His answer was simple: "Something unique but durable." At last, a client with only two requirements that seemed so easy to execute. Little did we know that those two words -- "unique" and "durable" -- would encompass over 40 considerations when all was said and done.
Here’s the short list of what we had to accomplish:
- Cast a meandering 65-foot-long bartop with many different radiuses, plus a 4-inch downturn along the front edge and a drip tray along the back with a 3/4-inch lip.
- “Digitizie” the shape of the existing bar so the forms for the new concrete bar, which would be placed right over the top, would be a precise match.
- Embed actual beer and liquor bottles (which had to be melted down first) and beer taps into the bartop.
- Incorporate the Taco Mac logo as well as a hand-drawn free-flowing ribbon, running from one end of the bartop to the other, using colors that matched the interior decor of the restaurant.
- Install the entire bartop during the evening after the restaurant closed, giving us a short installation window running from 11 p.m. on a Sunday night to early the next morning.
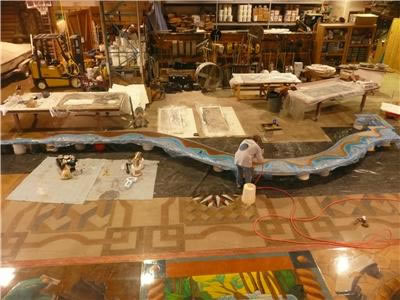
Forming and pouring the bartop
Considering the short time frame for installation, choosing the appropriate type of installation (cast-in-place vs. precast) became quickly obvious. However, choosing the precasting method presented a whole new set of challenges in order to accommodate all the twists and turns in this mammoth bartop. Casting the counter in place was not an option because of the amount of time it would have taken to form and properly cure the concrete. Our goal was to completely finish the counters at our shop and then thin-set them into place right over the top of the existing bar, applying silicone to the seams.
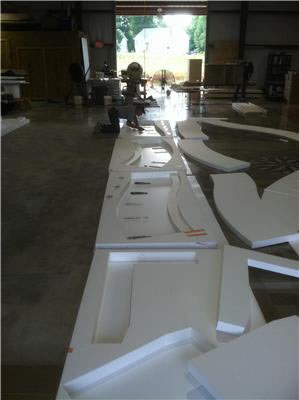 The foam form sections for the new bar were created using digitized templates of the existing bartop.
 Silicone was used to attach the bottles and beer taps onto the forms and seal the perimeters, so no concrete would ooze underneath.
After brainstorming and collaborating with my friend and colleague Mike Eastergaurd, the owner of PreiTech, a supplier of concrete countertop forming systems, he suggested using his company’s forming system that is entirely constructed of foam. We started out by contracting an independent company to digitize the entire existing bartop using a sophisticated device that took reference points around the entire top. The technician then gave us the file of reference points, which Mike entered into his AutoCAD system. By using this method, PreiTech was able to cut out nine thin foam panels that spanned the entire length of the bar. We used the lightweight foam panels as templates, making sure they followed the exact shape and contour of the bar. This method proved to be effective and very efficient. After determining that the templates were accurate, Mike went to work fabricating the foam forms.
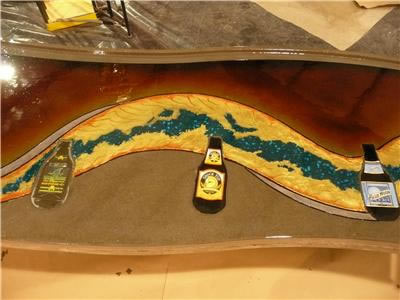 Real beer and liquor bottles, melted down flat, are embedded in the bartop surface. The bottle labels were removed before melting and reapplied afterwards using epoxy.
Before we could pour the concrete, there was one more important design aspect we had to take care of. When John had given me freedom to create “something unique,” we discussed melting beer and a variety of liquor bottles flat and using beer taps from the various vendors he does business with and then embedding them into the countertop. He loved the idea! We had to strategically position the bottles and beer taps onto the forms, using silicone to attach the embedments and seal the perimeters so no concrete would ooze underneath.
 Beer taps representing the various Taco Mac suppliers are also embedded in the bar.
Our pour required 26 50-pound bags of enCOUNTER fiber-reinforced concrete countertop mix, with polycarboxilate added to it to produce a self-consolidating concrete. Our longest panel was just over 8 feet. After the pour was complete, we used curing blankets to keep the concrete damp for five days. When it comes to curing concrete, I’m somewhat of a traditionalist and believe in the old school method.
Adding the decorative touches
Once the concrete was demolded from the forms, it was time to get busy on the coloring aspects for this monster countertop. Our main design objective was to continue the theme from one end of the bar to the other with our hand-drawn free-flowing ribbon. A 4-inch grinder with a diamond blade was used to cut the design into the surface of the concrete. After cutting was complete, we engraved the area between the sawcuts roughly 1/8-inch deep. This would later be filled flush with a variety of metallic epoxies.
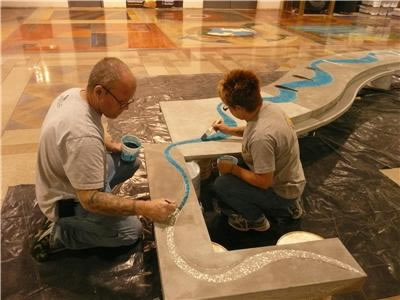 Bob and Lee Ann hand apply blue dye as part of the free-flowing ribbon, running all the way from one end of the bartop to the other.
The color scheme of the countertop was sectioned into three pieces. The top half consisted of air-brushed DCI dyes using sunrise yellow, sunbaked orange, and mahogany followed by a light over spray of onyx. The middle ribbon colors consisted of DCI’s Caribbean blue solvent-based dye and DCI’s metallic pigments, suspended in Kemiko’s SS 12021 epoxy. The bottom portion was left plain gray.
 Dye being applied by air brush onto the concrete surface. The dye colors were chosen to match the interior decor of the restaurant.
When working with decorative epoxies, especially on something so intricate, it can be challenging to keep them contained without having the epoxy bleed onto adjoining areas. Each time epoxy was applied it meant re-sawcutting the joints, since ultimately the saw joints would be filled with tile grout. This required a tremendous amount of concentration so no overcuts occurred. Also, we had to consider how we were going to re-attach the labels onto the beer bottles, since we couldn’t melt them with the labels on. What’s more, the bottles were now flat instead of rounded, which meant we had to trim the paper labels so they would fit on the bottles. To attach the labels, we started by applying a layer of epoxy to the bottles and then setting the labels into the wet epoxy. Once this coat dried, we applied several additional coats to lock the labels down.
One other decorative focal point of the bartop was the Taco Mac logo. We created this by using a precut Flattoo stencil from Surface Gel Tek. The stencil allowed us to outline the perimeter design of the graphic by etching it into the concrete with the use of Tek Gel. The depressed outlines were then sprayed with DCI onyx solvent-based dye. All of the other colors of the logo were hand painted with water-based acrylics.
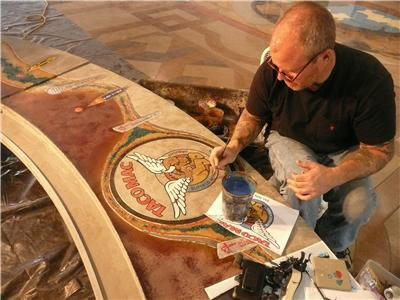 The Taco Mac logo was created with a Flattoo stencil.
Installation time
It was a big relief to complete the coloring and graphics, but there were still some major steps ahead of us, including clear coating the counters and, of course, transporting and installing them. For the final protective coats, we applied two coats of 100%-solids epoxy followed by one coat of polyaspartic, which offered greater resistance to scuffing and scratching. After the final clear coats had fully cured, it was time to transport the countertop sections. Fortunately, there was an enclosed staging area where we were able to store the sections until Taco Mac closed at night. Once the last patron left, the first order of business was to remove the existing drip edge on the back of the counter so the new counters could then be dry fitted before the actual installation.
Just when we thought everything was progressing fine, we discovered that two of the new panels were too tight of a fit. This meant standing on top of the existing bar and cutting through the tile and mortar bed with a 4-inch angle grinder and chiseling away the debris to expose the wood subbase. A sawzall was used to cut roughly 3/4 inch of the wood to allow for additional room to place the counters. This unplanned step added an additional two hours to an already long evening. At roughly 3 a.m., we were finally ready to fasten the new bartop into place using thin-set applied with a notched trowel. With the exception of having to shim a few panels to ensure a level fit, this process worked great. The last consideration was to fill the seams with a quick-setting black silicone. By around 7 a.m., the job was complete.
The next week, my wife Lee Ann, Mike and I went back to the restaurant under much more relaxed circumstances to enjoy a few beverages and reflect back on everyone’s hard efforts. The new bartop was definitely a main topic of discussion among both the bartenders and customers. The bartenders mentioned how easy the bartops were to clean in comparison with the old tile bartop. The customers displayed their admiration for the bartop by running their hands over the bottles.
To see a few short behind the scenes videos of this project, go to www.bobharrisvideos.com and click on the Taco Mac videos.
Product suppliers
Foam countertop forms: PreiTech (www.preitech.com)
Concrete countertop mix: enCOUNTER (www.encounter.com)
Precut stencil and etching gel: Surface Gel Tek (www.surfacegeltek.com)
Concrete dyes: Decorative Concrete Institute (www.decorativeconcreteinstitute.com)
Epoxy coating: Kemiko (www.kemiko.com)